Caramel-Dark Chocolate Truffles with Fleur de Sel (or Hawaiian Pink Salt)

Another truffle recipe. Well, I was on a truffle roll. Everywhere you turn these days, there seems to be another version of caramel/fleur de sel recipes. I actually hadn't tried one, but found these online (again, via Bon Appetit) and they looked delicious enough to try. And since I was already in a truffle-y mood, why not? I was not, however, about to go out hunting for the magical mystical fleur de sel that the recipe advocated. I had kosher salt, sea salt, flavored salt, and even Hawaiian pink salt (a gift from a friend) in my cupboard. I was not about to go out and buy yet another version of salt for truffles. 
Although I was curious as to what the big deal was with the product all of a sudden. It seems everywhere chefs are advocating using it instead of regular salt but for all my searching, I'm still not sure why. Apparently, it is supposed to have a more delicate flavor than regular sea salt (and the fact that it is "hand harvested" always goes a long way for gourmet products) but I haven't found anywhere that says you can't substitute a regular sea salt for any recipe that calls for it.
So hey, if you have it, by all means, go ahead and use it. I used the pink sea salt just because I thought it looked nice. And they still tasted delicious.  
Ingredients 

20 ounces bittersweet or semisweet chocolate, finely chopped, divided
1/3 cup sugar
2 tablespoons water
2/3 cup whipping cream
1/4 teaspoon fleur de sel (or sea salt or, for me, Hawaiian pink sea salt)
1/2 cup unsweetened cocoa powder
Additional fleur de sel (or whatever salt you're using)

Method

Place 8 ounces chocolate in metal bowl over saucepan of barely simmering water (do not allow bottom of bowl to touch water); stir until chocolate is smooth (This part can be tricky. For help with this, see my note for Gingerbread Truffles). Remove chocolate from over water.

Combine sugar and 2 tablespoons water in small saucepan. Stir over medium heat until sugar dissolves, occasionally brushing sides of pan with wet pastry brush. Increase heat; boil until syrup is deep amber color, brushing down sides and swirling pan occasionally, about 4 minutes. Add cream (mixture will bubble). Stir over very low heat until caramel is smooth. Mix caramel and 1/4 teaspoon fleur de sel into melted chocolate. Chill until truffle filling is firm, at least 3 hours.

Place cocoa in bowl. Using 1 tablespoon truffle filling for each truffle, roll into balls, then roll in cocoa. Arrange on baking sheet. Cover; chill overnight.

Line 13x9x2-inch baking sheet with foil. Place remaining 12 ounces chocolate in medium metal bowl over saucepan of barely simmering water (do not allow bottom of bowl to touch water); stir until chocolate is melted and smooth and thermometer inserted into chocolate registers 115°F. Remove bowl from over water. Working quickly, submerge 1 truffle in melted chocolate. Using fork, lift out truffle and tap fork against side of bowl to allow excess coating to drip off. Transfer truffle to prepared sheet.

Repeat with remaining truffles. Sprinkle truffles lightly with additional fleur de sel. Let stand until coating sets, at least 1 hour. (Can be made 1 week ahead. Cover and chill. Bring to room temperature before serving.)

Gingerbread Truffles

 We may be a bit past the time of year for gingerbread. But hey, things that are rich, delicious, and covered with chocolate never go out of season. Behold: gingerbread truffles. I'm not a huge huge fan of gingerbread by itself but these truffles, well, they take all the potential dryness and bread-iness of usual gingerbread and, well, make it exponentially better. By taking out the bread and adding chocolate. 
And who can argue with that?
The original recipe (from Bon Appetit, December 2005) called for half of these to be dunked in semi-sweet chocolate but as I'm a sucker for white chocolate (and I was making other kinds of semi-sweet truffles), I decided to go all white chocolate for this recipe. And I was pleased with my decision. Very pleased. 
Ingredients

3/4 cup whipping cream
10 whole allspice
10 whole cloves
1 tablespoon mild-flavored (light) molasses
1 1/2 teaspoons grated peeled fresh ginger
1/2 teaspoon ground cinnamon
Pinch of salt

7 ounces bittersweet (not unsweetened) or semisweet chocolate, chopped

7 ounces plus 12 ounces high-quality white chocolate (such as Lindt or Perugina), chopped
1/2 cup chopped crystallized ginger plus additional for garnish

Method

Bring first 7 ingredients just to boil in heavy medium saucepan; remove from heat and let steep 1 hour.
Combine 7 ounces bittersweet chocolate and 7 ounces white chocolate in large metal bowl set over saucepan of simmering water; stir until chocolate is melted and smooth (see chef's note at bottom for help with this). Remove bowl from over water. Strain cream mixture into chocolate; stir to blend. Stir in 1/2 cup chopped crystallized ginger. Chill filling until firm, at least 3 hours.

Line baking sheet with parchment. Using 1-inch melon baller, scoop filling and roll between palms to form balls. Place on parchment. Chill truffles at least 2 hours.

Line another baking sheet with parchment. Place 12 ounces white chocolate in another medium metal bowl set over saucepan of simmering water; stir until melted and smooth. Remove bowl from over water. Cool until thermometer inserted into chocolate registers 100°F. Hold 1 truffle between thumb and index finger; dip halfway into white chocolate. Place on prepared sheet. Repeat with remaining truffles. If desired, press small pieces of crystallized ginger atop truffles. Chill until firm, about 30 minutes. (Can be made 1 week ahead. Cover; keep chilled.)

Chef's Note: Now, truffles are the latest "hip" make-it-yourself gift and, as a "hip gift-giver" myself, I admit, these work well. They look impressive and well, who doesn't like truffles? There is a trick to working with chocolate though. When double-boiling/melting the chocolate, you run the risk of having the chocolate separate on you, making it go all glossy and nasty. It won't fridge right, and it'll make it impossible to work the ganache into balls. If this does happen, never fear! If you see your chocolate start to separate, throw a dash (only a dash!) of hot/boiling water into the melting chocolate. The chocolate will come right back together and you can get on with your ganache making in safety. This happens to me almost every time I make anything with chocolate and without this trick, I would have given up chocolate long ago.

Brandy Hard Sauce (with Pear and Sour Cherry Brown Betty)

As I've lived in England for some time now, I felt that I had a pretty good understanding of the "dessert" culture over there across the pond. The fruit cakes, the mince pies, the gooseberry fools, the bread and butter pudding, the bannoffee pie...
All these desserts seemed to revolve around the basic (fundamental) concepts of butter, bread, and cream. I mean, they put custard on everything there. But, imagine my surprise when I learned (from an American newspaper of all places) about a concept so absolutely wonderful that I began to suspect that the Brits were keeping it from me on purpose. Why wouldn't you share something as wonderful as sweet whipped cream with alcohol in it?!

Even the concept is genius, showing just enough English organization and forethought with a healthy appreciation of alcohol (and a desire to include it in every meal). Imagine whipped cream, solidified. not frozen, mind you. Just solid. Like cold butter solid (well, because it's basically just cold butter).

The recipe from the New York Times pared it with a cherry and pear brown betty, which was delicious (especially as the cherries were also soaked in brandy), but really, any dessert will work with this. Particularly warm ones so you can watch the hard sauce melt into it, infusing your chosen dessert with buttery alcoholic goodness. Oh yes.

Hard Sauce

Ingredients

12 tablespoons unsalted butter, softened
1 1/4 cups confectioners’ sugar
1/4 cup Cognac or brandy
Pinch of grated nutmeg

Method

To make the hard sauce, in a medium bowl set an electric mixer on high and beat the butter until fluffy.
Reduce speed to low and add confectioners’ sugar. When the sugar is incorporated, set the speed back to high.
Add the brandy 1 tablespoon at a time and beat until combined. Beat in the nutmeg.
Transfer the sauce to a ramekin or bowl, cover and refrigerate.

Hard sauce can be made at least a week ahead, but allow it to come to room temperature before serving (about 20 minutes). 

Brown Betty

Ingredients
 
3 tablespoons Cognac or brandy
2/3 cup dried cherries
1/2 cup sugar
1 teaspoon grated nutmeg
1/2 teaspoon ground cinnamon
3 1/2 cups white bread or challah, cut into 1/2-inch cubes
7 tablespoons unsalted butter, melted
Grated zest of 1 lemon
2 pounds ripe pears(about 5 pears), peeled, cored and thinly sliced
3 tablespoons hard cider or apple cider.

Method

To make the brown betty, heat the Cognac or brandy in a small saucepan over medium heat. When the liquid has come to a simmer, turn off the heat and add the cherries. Allow them to absorb most of the liquid, about 20 minutes.

While cherries are standing, heat oven to 375 degrees. In a large bowl, whisk together the sugar, nutmeg and cinnamon. Set aside 2 tablespoons of the sugar mixture for sprinkling. Add bread, butter and lemon zest. Toss until sugar has dissolved and bread is completely coated.

In a shallow 1 1/2-quart gratin dish (or a 9-by-9-inch pan), scatter a little under half the bread cubes. Layer half the pear slices and half the cherries (along with any liquid) on top. Cover with a cup of bread crumbs and sprinkle with 1 1/2 tablespoons cider. Layer remaining pears, cherries and bread. Sprinkle top with remaining cider and reserved sugar-and-spice mixture.

Cover dish with aluminum foil and bake for 40 minutes. Take off foil and continue baking, until crumbs are golden brown and pears are very soft, about 15 minutes more. Serve warm with dollops of hard sauce.

Yield: 6 to 8 servings.

Apple Green-Chili Pie with Cheddar Crust and Walnut Streusel

Ok, ok, I know what you're thinking. Well, one of probably two things.

A) That recipe sounds disgusting! Why would you want to put cheddar with walnuts and chilis?! And let's not even mention that it's in a pie! Pie sacrilege!

Or

B) Mmmmm. Apples, cheese, and nuts. With spice? Count me in! But how to serve it? as a main course or a dessert?!

Well, dear readers, you may be surprised that, in fact, I was a steadfast member of Option A for a long while. The New York Times, in their infinite wisdom, declared that this year was the year of the pie (as opposed to the last few, which were apparently the years of the cupcake. I don't have time to keep up with these things). And among their many "new hip stylish" pie recipes was this little number. The people who developed it (some crazy hippies out in San Francisco apparently) swore to its deliciousness. And if San Franciscans and New Yorkers ever agree on something, well, it's worth a try.
And so I attempted the crazy masterpiece, not sure if this would result in such a horror that I would swear off pie-making for good (not that I was ever what one would call a prolific pie-maker).
But no! Once it was all assembled, baked, and cooled, and the first tentative bite was taken, I could see what both coasts had been saying. It was delicious. Sweet, with just a hint of chili (the New Mexican chilis used in the pie give it a smokey but not fiery flavor) and a great crunch of walnut streusel on top. (By the by, if you were looking to an answer for Option B's dilemma of whether this was a savory or sweet dish, this is most definitely a dessert. The chilis don't diminish at all the significant amount of sweetness in the walnut streusel and apples.
This was chili pie conversion.
Now, this perhaps is not the pie to serve to an unknowing audience. Despite my new-found love of chili pie, the dessert did not win over everyone (my father, in particular, couldn't get over the "weirdness" of it). But never you mind. Go ahead, try it. You'll (probably) like it.

Ingredients

For the crust: 
1 1/4 cups all-purpose flour
1/4 teaspoon salt
1/3 cup cold unsalted butter, cut into dice
1/2 cup grated sharp Cheddar cheese
5 tablespoons ice water, more as needed


For the filling
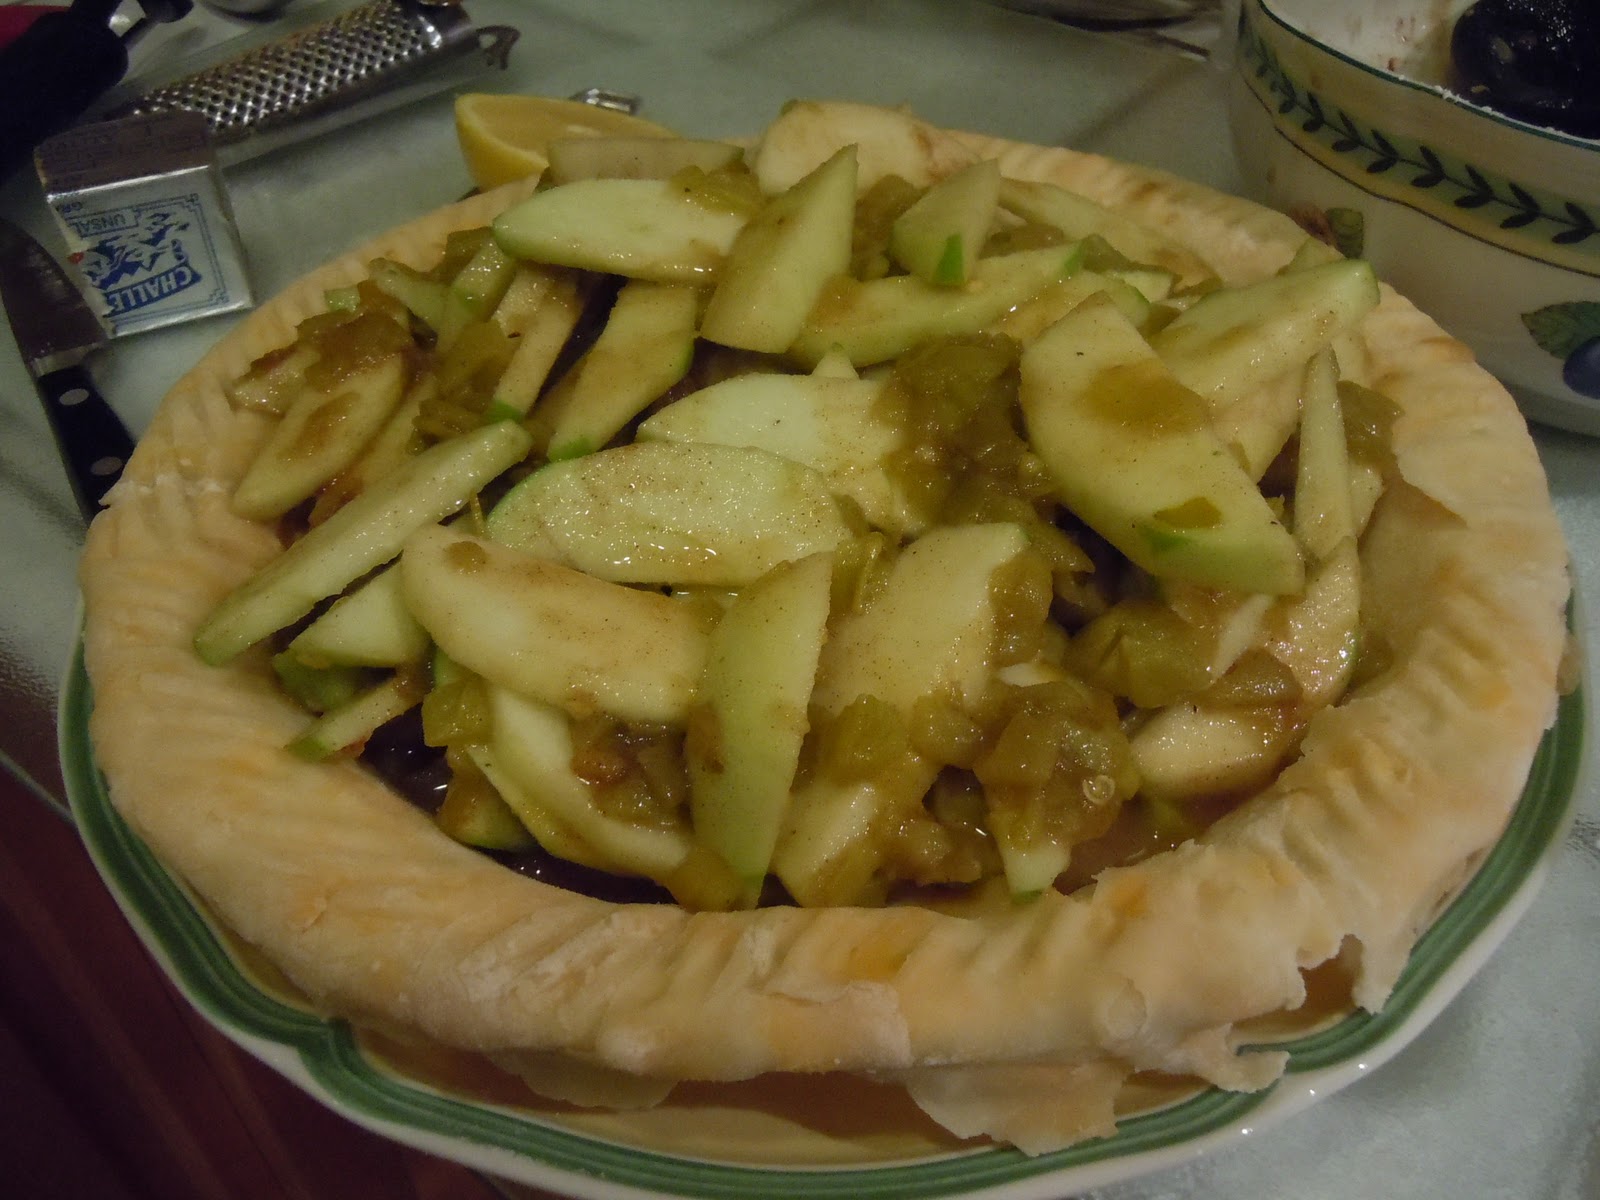
5 cups peeled and thickly sliced tart apples, such as Jonagold, Honeycrisp or Granny Smith (I used Granny Smith)
1/2 cup chopped roasted green Hatch chilies, mild or medium hot (see note)
2 tablespoons fresh lemon juice
1/2 cup granulated sugar
1/4 cup light brown sugar
1/2 teaspoon cinnamon
1/4 teaspoon allspice
1/4 teaspoon nutmeg, preferably freshly grated
1/4 teaspoon salt
1/4 cup cornstarch


For the topping:
1/2 cup all-purpose flour
1/2 cup finely chopped walnuts
1/4 cup light brown sugar
4 tablespoons unsalted butter, melted

Method

1. Make the crust: In a food processor or mixer fitted with a paddle attachment, combine flour and salt. Add butter one piece at a time, while pulsing or mixing at low speed, until mixture is fine and crumbly. Transfer to a large bowl and toss well with the cheese. Add ice water one tablespoon at a time, mixing lightly with fingers just until dough holds together. To test, pinch a small amount of dough. If it is crumbly, add more ice water. Form dough into a ball, wrap loosely in plastic, then roll into a disk. Refrigerate at least one hour, or up to 3 days, before rolling. (Dough can be frozen for up to a month.)

2. On a lightly floured surface, roll dough into a circle at least 11 inches in diameter. Transfer to a 9-inch pie pan, preferably glass. Turn edges under to make a thick rim; flute rim by pinching into a zigzag pattern. Refrigerate until ready to bake, at least an hour.

3. Make the filling: In a large bowl, toss apples, green chilies and lemon juice together. In another bowl, mix dry ingredients and add to apples and chilies, tossing until thoroughly coated.

4. Make the topping: In a small bowl, mix flour, walnuts and brown sugar. Add melted butter and toss together until crumbly.

5. Bake the pie: Heat oven to 400 degrees. Using a slotted spoon, scoop filling into chilled crust, then drizzle with 2 tablespoons of juice from bottom of bowl. Sprinkle topping evenly over filling. Bake 10 minutes, then reduce heat to 375 degrees. Bake 30 to 40 minutes, or until filling bubbles at edge and crust is brown. Serve warm, with a scoop of vanilla ice cream on the side.

Yield: About 8 servings.

Note: Roasted green Hatch chilies from New Mexico can be ordered from newmexicanconnection.com, and are sometimes found frozen in grocery stores. Drained canned green chilies are acceptable.

Fluffy Make-Ahead Dinner Rolls

Oh, dinner rolls. Is there anything better? I'm not a bread snob. No, no. Anything with a nice carbohydrate base will do just fine for me. Few requirements. Few needs. 
So I couldn't pass up the chance to make my own "straight from the 1950s" dinner rolls when I stumbled across this recipe. 
Well, I almost did when I saw that they took up to 5 hours to make. But ah well, I was struck with the Christmas spirit and made them anyway. And (as you'll see), the 5 hour estimate was way over. I mean, they aren't 30 minute rolls or anything, but don't think you'll be chained to the kitchen for an entire day and a half.
These, like the "impossible breakfast casserole" come from the January 2007 edition of Cook's Country. And they looked so buttery and delicious. Well. You find a way of turning these down. 
But, be warned, dear readers. These rolls are temperamental. Knead too long and you'll end up with dense starchy things. Sure, they'll look fabulous, but they'll sit in your stomach like a lump of lead. Be gentle.
Makes 15 large rolls
Ingredients
3 tbsp. unsalted butter, plus 2 tbsp. for bowl and baking dish
1 1/2 cups whole milk
1/3 cup honey
4 tbsp. vegetable shortening
5- 5 1/2 cups all-purpose flour
1 tbsp rapid-rise or instant yeast
2 tsp salt
1 large egg, plus 1 large egg beaten with 1 tbsp water
Method
Adjust oven rack to middle position and heave oven to 200 degrees F. When oven reaches 200 degrees, shut oven off. Grease a large bowl with 1 tbsp. butter. Line 13 x 9 inch baking dish with foil, leaving overhang on all sides. Grease foil with 1 tbsp. butter.
Place milk, honey, shortening, and remaining 3 tbsp. butter in large measuring cup. Microwave on high power until milk is warm (110 degrees) and butter and shortening begin to melt, 1-2 minutes. Stir well.
Mix 4 1/2 cups flour, yeast, and salt in bowl of standing mixer fitted with dough hook. Turn mixer to low and slowly add milk mixture. After dough comes together, increase speed to medium, add 1 egg, and mi until dough is smooth, about 2 minutes. Add another 1/2 cup flour and knead until dough is  shiny and smooth and comes away from sides of mixing bowl, 6 to 7 minutes. (add up to 1/2 cup more flour if dough is too sticky) Turn dough onto floured surface and knead briefly to form smooth cohesive ball. Transfer dough to buttered bowl and turn to coat. Cover bowl with plastic wrap and place in turned-off oven until dough has doubled in size, 50-60 minutes. 
Punch dough down on floured surface and divide into 3 equal pieces. Roll each piece into thick cylinder and cut each cylinder into 5 equal pieces. Working one piece at a time (keep remaining pieces covered with plastic wrap), form dough pieces into smooth rounds and arrange in a prepared baking dish. Lightly press on dough rounds so that they just touch each other. Cover baking dish with plastic wrap and return to turned-off oven until dough rounds have doubled in size, 50-60 minutes.
Remove dish from oven and heat oven to 375 degrees. Unwrap baking dish and brush rolls with egg-water mixture. Bake until rolls are deep golden brown, 25-27 minutes. Remove from oven and cool on wire racks for 5 minutes. Using handles of foil sling, remove rolls from baking dish and cool on wire rack.  (Note: Ok, here's where the recipe says you should cool these puppies for an hour. Ridiculous. They also say that after this, you should cool for another TWO HOURS! after this. My rolls were room temperature in 15 minutes and delicious. So forget that.)