Raw Butternut Squash and Carrot Salad

I do have a soft spot in my heart for Mark Bittman (Bitty, aka the "Bittster"). I watched his travels in Spain with Mario Batali and Gwyneth Paltrow (who invited a vegetarian to a pork-based country?) and was endlessly amused by his no nonsense "I'm from New York" attitude.
And he gets double points for his alter-ego, the Minimalist (a fantastic culinary superhero name in my book), his blog on the NY Times that emphasizes quick and easy recipes. And in terms of quick and easy, this recipe took the cake. Or rather the carrot. Even I, a longtime Minimalist fan, saw his recent posting about the glory of serving raw vegetables, I was initially unimpressed. I mean, cutting up vegetables and serving them with ranch dressing is not exactly rocket science.
But I had judged Bitty too quickly. As I scrolled through the recipe for a raw butternut squash salad, my dismissal turned to mild curiosity. Butternut squash? Raw? I mean, I'm a hearty supporter of the vegetable, but having chomped down on a few "not-quite-cooked" pieces now and again, I was skeptical of the vegetable's potential as a raw side dish.
Alas, again, I judged too quickly. Grating the butternut squash was key. It produced this fresh delicious salad, perfect for using up those butternut squashes which (if you're like me) are optimistically bought at the market and then just.quietly sit on the counter for weeks, sadly unused and under-appreciated.
I followed Bittman's recipe initially but then decided one raw orange vegetable really deserves another, so added shredded carrot to the mix. For the win.

Ingredients

1 butternut squash (about 1 1/2 pounds), peeled, seeded and grated

2 medium carrots, peeled and grated

4 spring onions, chopped

1/2 cup raisins

1/8 cup vegetable oil

1/8 cup toasted sesame seed oil

2-3 tablespoons sherry vinegar, or to taste

1 1/2 tsp cayenne pepper (or crushed chillis)

2 tablespoons minced fresh ginger

Salt and freshly ground black pepper.


Combine the squash,carrots, spring onions, cayenne/chillis, raisins, oil, vinegar and ginger in a salad bowl; sprinkle with salt and pepper. Toss, then taste and adjust the seasoning. Serve immediately, or cover and refrigerate for up to several hours.

Yield: 4 servings.

Southwestern Deviled Eggs

These comprise Part Deux of "Savory Halloween 2010", an accidental but delicious culinary experiment. Overwhelmed with sweet goodies, I needed something savory and, in homage to my Arizonan roots, spicy. I had recently purchased some Chipotle Chiles in adobo sauce from my first foray to Borough Market (see carniverous pumpkin photo below) and I was yearning to try it out in any way possible. A quick recipe search for deviled eggs (what could be more Halloween-y than that?) brought up Emeril's recipe for Southwestern Deviled Eggs, complete with what was termed "Emeril's Southwestern Seasoning". Well, it seemed fairly standard to me, but as it was delicious, credit needs to be given where credit is due.

The other surprise lesson learned in the course of this recipe was that of the "perfect hard boiled egg". I know, I know, there's no excuse for me *not* to know how to boil an egg at this late stage, but there's always been something slightly mysterious to me about the whole process. Do you start with cold water? Hot water? How long do you boil them? How long do you let them rest? How do you get the shells to come off easily? Well, again, the internet provided me with all the answers I needed. The hard boiled egg recipe I used worked like a charm and made peeling those bad boys a snap. 

The only substitute to this recipe was the swap of dijon mustard mayo (found in my local Tesco) for regular mayonnaise. It made it just that much more zesty, and who doesn't like mustard in deviled eggs? For those of you out there without the convenience of the Tesco-based product, a mix of dijon mustard and majo will surely work just fine. Enjoy!


Ingredients

  • 1 dozen hard-boiled large eggs, peeled (recipe follows)
  • 1/2 cup mayonnaise (or dijon mustard/mayo mix)
  • 2 tablespoons finely minced pickled jalapenos, drained
  • 2 tablespoons canned chipotle in adobo sauce
  • 1/2 teaspoon Emeril's Southwest Seasoning, recipe follows
  • Pinch salt
  • 1/4 teaspoon smoked hot paprika, for garnish


Directions

Slice the eggs in half lengthwise and carefully remove the yolks. Press the yolks through a fine-mesh sieve into a mixing bowl. Add the mayonnaise, jalapenos, chipotle in adobo, Southwest Essence, and salt to taste. Stir to blend well. Spoon the mixture into the egg whites. Cover and chill for at least 1 hour. Sprinkle with the paprika just before serving. (If the paprika is added too early it will stain the eggs.)


Emeril's Southwest Seasoning:

  • 2 tablespoons chili powder
  • 2 teaspoons ground cumin
  • 2 tablespoons paprika
  • 1 teaspoon black pepper
  • 1 tablespoon ground coriander
  • 1 teaspoon cayenne pepper
  • 1 tablespoon garlic powder
  • 1 teaspoon crushed red pepper
  • 1 tablespoon salt
  • 1 tablespoon dried oregano
Combine all ingredients thoroughly.

Yield: 1/2 cup

Perfect Hard-Boiled Eggs

Carefully set eggs in a pan. You may use as few as one or as many as a dozen. Cover the eggs with 1" of cold water.

Set the pan on the stove and heat until water comes to a rolling boil.

Cover with a lid and set off. Let sit for approx. 15 minutes.

Dump water and fill pan with ice-cold water. Leave the eggs in the pan.  Let sit 15 - 20 min and dump the water. Your eggs are ready for peeling.

A Borough Market carnivorous pumpkin

Pretzel Bites (aka Halloween Ladies' Fingers)

  I've always had a soft spot for Halloween, not just because of the free candy. Well, ok, not entirely because of the free candy. Particularly as I've grown older and the option of trick or treating has become increasingly unlikely, I've had to make my own delectable treats in celebration of ghouls, goblins, etc. But ironically enough, it's a savory treat that I associate most with the holiday. Way (and I mean way) back in high school, I hosted a Halloween party for my friends. Looking for food ideas of a non-candy variety (we did have to eat some form of dinner), I stumbled upon these creations by none other than the hostess with the mostest, Martha Stewart. Called "Ladies' Fingers", they were small bite-size pretzels shaped to look like, well, you guessed it, fingers. The original recipe called for sliced almonds, dyed red with food coloring, to make the pretzel look like an actual finger.

Now, way back when, I followed dear Martha's advice to the letter. Fast forward a few (ok, more than a few) years and I couldn't be bothered by the multi, multi, multi step process that involved not only making your own pretzels, but also dying and attaching red almond slices just for the spooky effect. And considering there would only be two of us to eat them, well, it just seemed silly. So, I turned them into normal pretzel bites, which were phenomenal in their own right. Sprinkled with sea salt and rosemary, these babies disappear faster than you can say "Happy Halloween". And hey, if you're feeling creative, go crazy and do it the Martha Stewart way. They look awesome and if you're having guests, they're sure to impress.

Makes 4 dozen


Red or green food coloring (optional, for fingers)
24 blanched almonds, halved lengthwise
2 cups warm water (110 degrees), plus 3 quarts, plus 1 tablespoon
1 tablespoon sugar
1 package active dry yeast (1/4 ounce)
Vegetable oil
5 to 6 cups all-purpose flour, plus more for work surface
1 tablespoon coarse salt
2 tablespoons baking soda
1 large egg
Sea salt
Rosemary (dried)

Directions
1. Place a small amount of food coloring, if using, in a shallow bowl, and, using a paintbrush, color the rounded side of each split almond; set aside to dry.

2. Pour 2 cups water into the bowl of an electric mixer fitted with the dough-hook attachment. Add sugar; stir to dissolve. Sprinkle with yeast, and let stand until yeast begins to bubble, about 5 minutes. Beat in 1 cup flour into yeast on low speed until combined.

3. Beat in coarse salt; add 3 1/2 cups flour, and beat until combined. Continue beating until dough pulls away from bowl, 1 to 2 minutes. Add 1/2 cup flour. Beat 1 minute more. If dough is sticky, add up to 1 cup more flour. Transfer to a lightly floured surface; knead until smooth, 1 minute.

4. Coat a large bowl with cooking spray. Transfer dough to bowl, turning dough to coat with oil. Cover with plastic wrap; let rest in a warm spot to rise until doubled in size, about 1 hour.

5. Preheat oven to 450 degrees. Bring 3 quarts water to a boil in a 6-quart straight-sided saucepan over high heat; reduce to a simmer. Add baking soda. Lightly coat two baking sheets with cooking spray. Divide dough into quarters. Work with one quarter at a time, and cover remaining dough with plastic wrap. Divide first quarter into 12 pieces. On a lightly floured work surface, roll each piece back and forth with your palm forming a long finger shape, about 3 to 4 inches. Pinch dough in two places to form knuckles. Or, to make toes, roll each piece so that it is slightly shorter and fatter, about 2 inches. Pinch in 1 place to form the knuckle.

6. When 12 fingers or toes are formed, transfer to simmering water. Poach for 1 minute. Using a slotted spoon, transfer fingers to the prepared baking sheets. Repeat with remaining dough, blanching each set of 12 fingers or toes before making more.

7. Beat egg with 1 tablespoon water. Brush pretzel fingers and toes with the egg wash. Using a sharp knife, lightly score each knuckle about three times. Sprinkle with sea salt and rosemary, if using. Position almond nails, pushing them into dough to attach.

8. Bake until golden brown, 12 to 15 minutes. Let cool on wire rack.

Fingers and toes are best eaten the same day; or store, covered, up to 2 days at room temperature.

Chocolate Oat Bars

Last weekend I had the joyous, nay rapturous, pleasure of a lazy Sunday. With nothing to do and the weather outside a delightful October crisp, baking was deemed obligatory. And not just any baking. Comfort baking. Low fat vegetables need not apply.

At such times, I turn to the Culinary Canon of the US, that is, the inimitable Joy of Cooking, now in its 154th edition (or something along the lines). It has provided the much-needed comfort food of home on many a desperate occasion. When I read the recipe I knew these would itch that longing-for-US-baked-goods scratch. And indeed. That's exactly what they did. Because just plain ol' chocolate wouldn't suffice for such Sundays, I also threw some peanut butter on top. You know, just to make it extra comfy. These bars are like the food version of your favorite old sweater. Nothing surprising. Nothing extravagant. But like a hug from home.

Makes one 13x9'' dish (about 12 bars)

Ingredients

3/4 cup (1 1/2 sticks) + 1 1/2 tablespoons unsalted butter, softened
1 1/2 cups packed brown sugar (I used light brown)
1 large egg
1 large egg yolk
1 1/2 teaspoons + 3/4 teaspoon vanilla
1 3/4 cups all-purpose (or plain) flour
3/4 teaspoon baking soda
3/4 teaspoon salt
2 1/4 cups old-fashioned rolled oats
1 1/2 cups semisweet chocolate chips
1 1/4 cups sweetened condensed milk 
3/4 chopped walnuts
Optional: peanut butter or nutella

Preparation

Preheat the oven to 350 F. Grease a 13 x 9 inch baking pan.

Beat together the 3/4 cup butter and brown sugar.

Beat in the egg, egg yolk, and 1 1/2 teaspoon vanilla. Set aside.

Whisk together in a separate bowl the flour, baking soda, and salt. Stir in the oats.

Combine the chocolate chips, condensed milk, 1 1/2 tablespoons butter, and salt in a medium saucepan and stir over the low heat until smooth. Stir in 3/4 teaspoon vanilla and the walnuts.

Remove the mixture from the heat. Stir the flour mixture into the egg mixture. Pat about two thirds of it into the baking pan. Pour the chocolate mixture over all, then dot with the remaining batter. At this point, if you feel like adding peanut butter, add teaspoon scoops to the top of the mixture.

Bake about 25 minutes. Cool completely in the pan on a rack.

Coconut Milk and Cream Soup Cooked in a Pumpkin

A few weeks back it was Canadian Thanksgiving. Now, I'm all about the good ol' American way of celebrating (that is, in November), but there is rarely a time when I turn down good food. And, oh my, was this food good. Nay, glorious. The highlight of the evening had to be the cooked pumpkin soup. That's right, a soup cooked inside a pumpkin. A creamy buttery concoction that actually let you scrape the insides of the pumpkin with a ladle to get as much of that delicious sinewy goodness as you wanted for your bowl. Now if that isn't an "impress your guests" kind of moment, I don't know what is. 

I spent the rest of the evening begging for the recipe. It turns out the recipe was from a "River Cottage" episode, a cooking show based in the UK. When I looked up the recipe online, I was almost bowled over by the fact that there were only three predominant ingredients in the entire soup: cream, Gruyere cheese, and, well, pumpkin. But the idea was so genius, I couldn't pass it up. I decided to tweak the idea just a bit, partially for my own health conscience (little as it may be) but more importantly to beef up the flavor a bit. So I added what I think is always a winning combination: coconut milk. By adding a little spiciness, some stock, and the coconut milk, it really fleshed out the flavor alongside the cheese and cream. I served it the week after Canadian Thanksgiving to rave reviews. 

The only thing I will warn about is timing. It's hard to tell when the pumpkin is done, i.e. when the soup is warm enough to eat and the flesh of the pumpkin is cooked through. You also have to be wary of structural integrity issues. As the pumpkin cooks, it understandably becomes softer, which means your soup bowl may become a bit soggy and, if left unattended for long enough, collapse in the oven in a great pile of pumpkin-y goo. This is a bad thing. So, the only thing I can recommend is watching the pumpkin quite closely when you think you're getting close to being done. 

Serves 4-6 generously

Ingredients

  • 1 medium (3-4kg) pumpkin or several small squashes (1 per person)
  • 4 stalks of lemongrass
  • juice of one lime 
  • 2 x 50mm ginger, peeled
  • 2 cloves of garlic, peeled
  • 6 red chillies
  • juice of 2 limes
  • black pepper
  • sea salt
  • 2 tbsp vegetable oil
  • 2 banana shallots finely chopped
  • 5 g cumin seeds (or ground)
  • 600 ml vegetable stock
  • 400 ml tin coconut milk
  • sprigs coriander/cilantro, to garnish
  • Up to 500g Gruyere cheese, grated (depending on the size of your pumpkin)
  • up to 400 ml of cream
  • freshly grated nutmeg
  • a knob of butter
  • salt and freshly ground black pepper

Method

Preheat oven to 190°c/Gas Mark 5.

Slice the top off the pumpkin or squashes three-quarters of the way up and retain; this is your lid.

Scoop out all the seeds and surrounding fibres from the pumpkin.

Place the scooped-out pumpkin on a baking tray or in an ovenproof dish (which must have sides to catch any leaking cream - an accident that shouldn't, but can, happen).

Peel the outer coating from the lemon grass stalks and finely chop the white bulbous part of the stalks, discarding the rest.
Mix together the lemon grass, lime juice, ginger, garlic, chillies and lime juice into a smooth paste. Season with salt and freshly ground pepper.

Heat 1 tbsp oil in a heavy-based saucepan. Gently fry the shallots and cumin seeds for 3-5 minutes, then add in half the paste and fry, stirring often, for 5 minutes until fragrant.
 

Pour in the stock and bring to the boil. Reduce the heat and simmer for 7-8 minutes.

Put enough grated Gruyere into the empty cavity of the pumpkin to fill about a third of it, then pour in double cream and coconut milk until the cavity is two-thirds full.

Add a few gratings of nutmeg, a little salt and plenty of black pepper. Throw in a knob of butter and replace the lid, so the pumpkin is whole again.

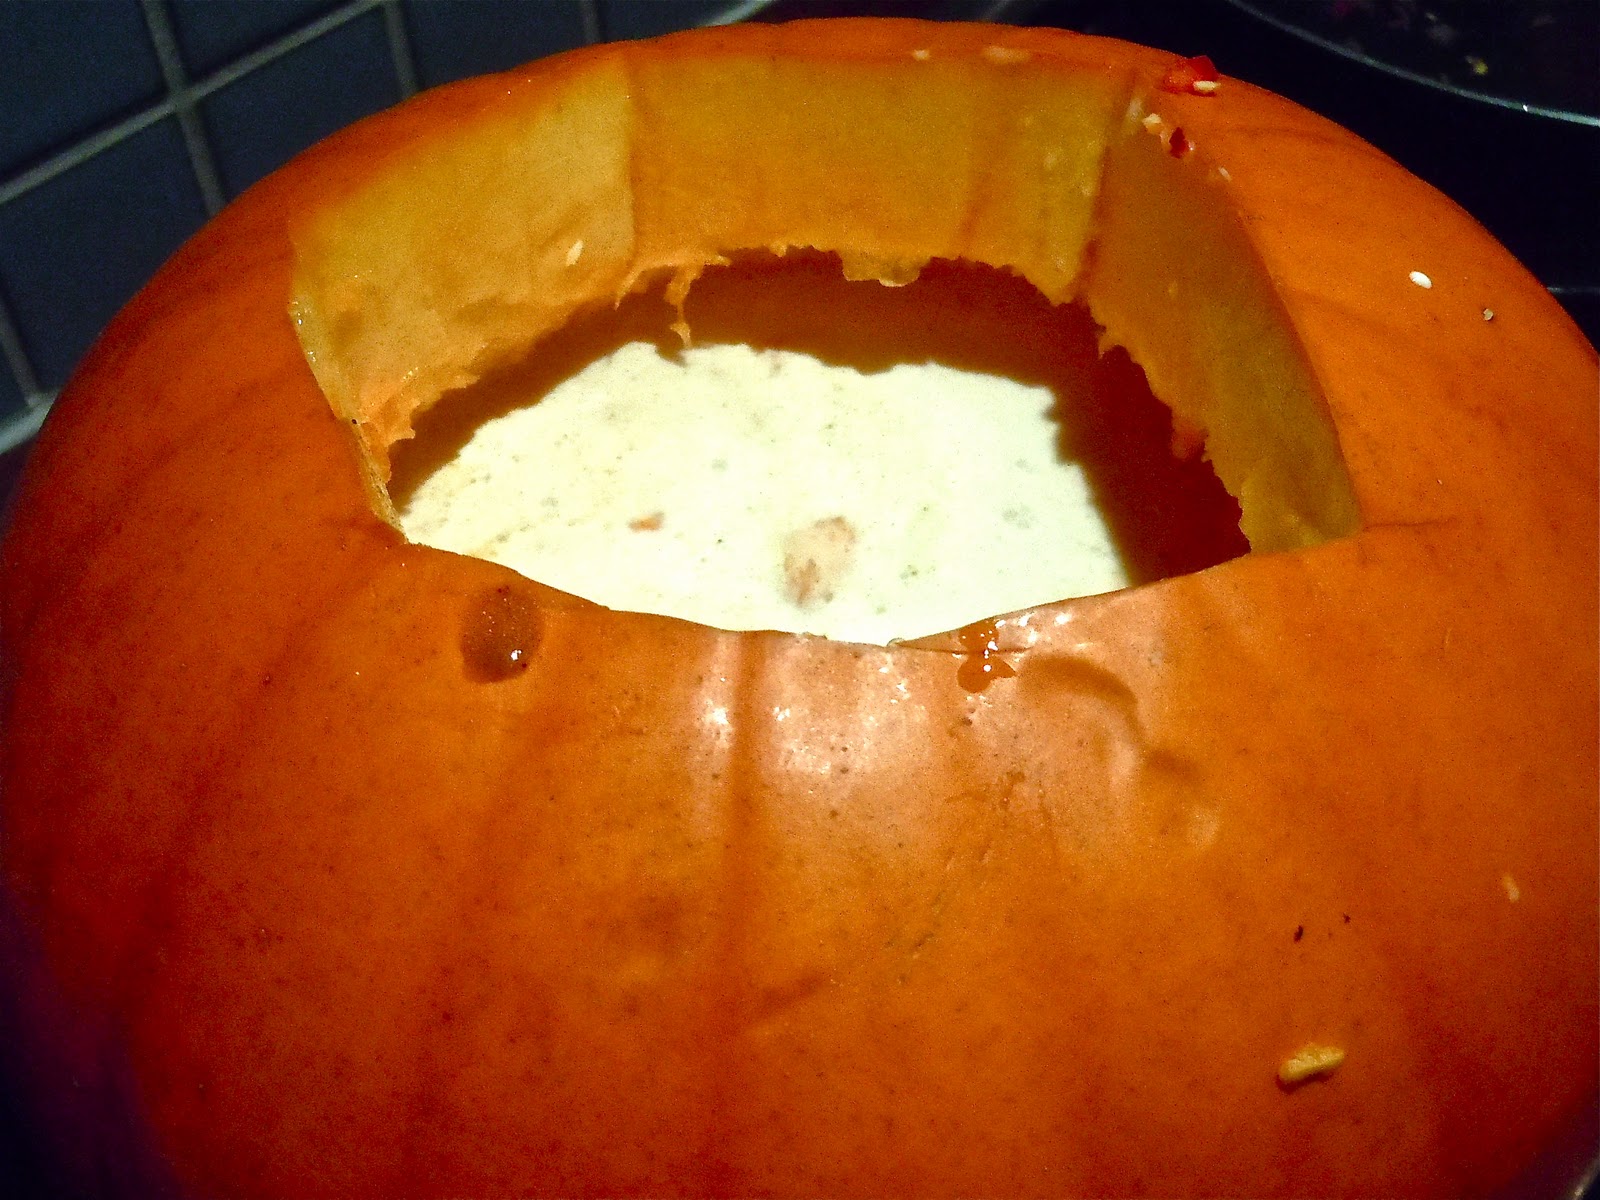
Place in a fairly hot oven (190°c/Gas Mark 5) and cook for 45 minutes-11/4 hours (for me, this was more on the 1 1/4 hours side of things), depending on the size of the pumpkin. Test for doneness by removing the lid and poking at the flesh from the inside. It should be nice and tender.

At this point, the skin may be lightly burnt and the whole thing just beginning to sag a bit. Be wary: when the pumpkin is completely soft and cooked through, there is a real danger of collapse.

The larger the pumpkin, the bigger the danger. Don't panic if it happens - it will look a bit deflated but will still taste delicious.

Serve small squashes individually in bowls, with spoons to scoop out the flesh. Serve the larger pumpkin by scooping plenty of flesh and the creamy, cheesy liquid (the Gruyere comes out in lovely long, messy strings) into warmed soup bowls. Either way, serve piping hot.