Sweet Potato Hash with Corned Beef and Bacon with Melted Onions

How to describe the oddity that is hash? It's not really a dish, per se, more of a conglomeration of various products. Most hash resembles something that you'd find on a standard American breakfast plate: potatoes, meat, and usually an egg or two. Onions are usually added to give the whole thing some flavor, but honestly, it's among the more basic items on any menu. My father even swears that at one point (and I have no proof of this except his word) they sold it out of a can. Now I'm not sure how that would be possible (although science usually has a way of finding ways round these kind of obstacles), but there you go. So basic, you can find it in a can.

Like the humble pie, hash apparently is experiencing a resurgence in popularity in restaurants across the US. Instead of your basic potatoes, bacon, and eggs, you can now find all sorts of upscale variations of this dish, depending on your taste. In the Mission District in San Francisco, I was able to try some tongue and potato hash which, I have to confess, was absolutely delicious. Thank you, Hog and Rocks. And yes, their specialties were pig and oysters. Anyone surprised?

Regardless, hash is easy enough for anyone to cook but allows for endless variations. This particular recipe (as usual, found in the New York Times) originally called for just bacon, but in my mind, corned beef should never be turned down as a possible meat alternative. And, thanks to the wonders of science yet again, they now have corned beef available pre-cooked. Just heat and serve! This was clearly a win. The sweet potatoes were also a great substitution. I used white sweet potatoes to add just a bit more starchiness rather than yam-iness (?) to the dish. And it was a good decision.

No matter how you eat your hash or serve this recipe, do NOT neglect the onions. Yes, they take a bit of time. But mostly they're sitting in a pot, soaking in their own juices. And with a stick of butter melting into them, they are deliciously bad for you. Try to say no to them. Just try.

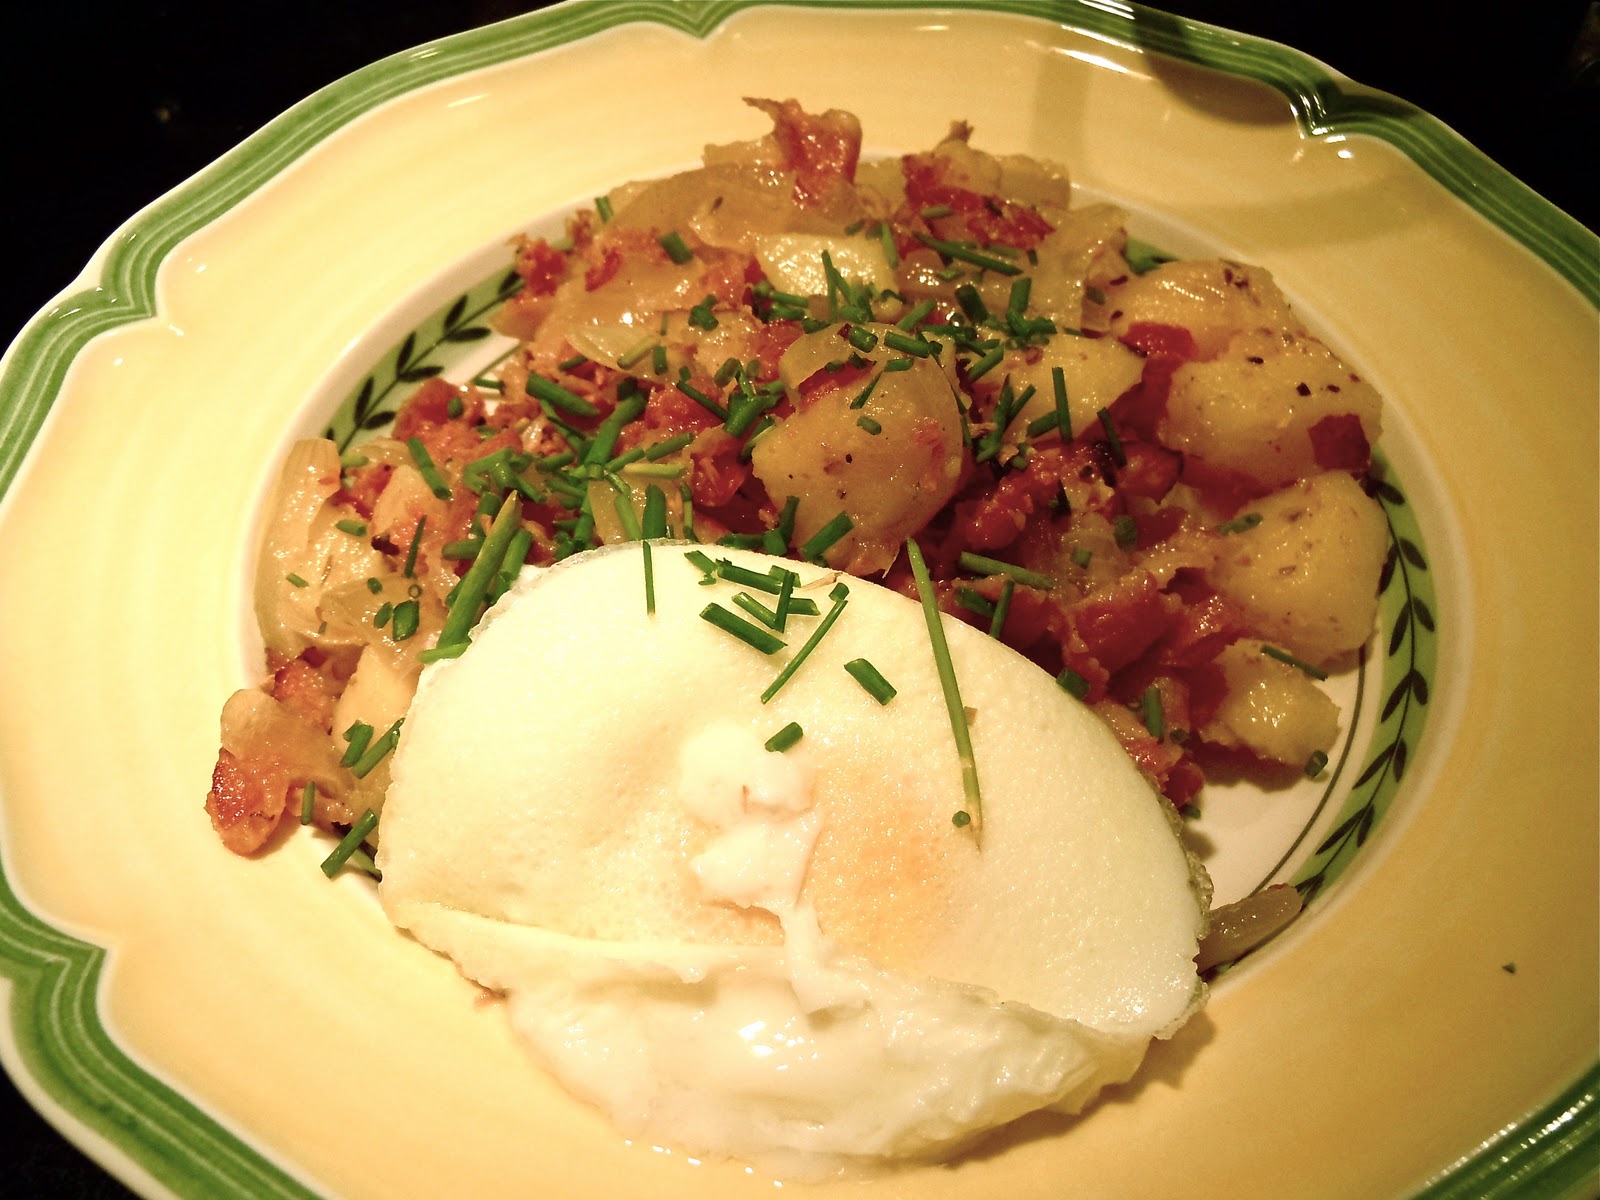
Now the bizarre white thing in the photo above is a poached egg. I know. It doesn't look right. I used one of those new-fangled "egg poaching cups" that swears it will make egg poaching the easiest thing ever. Well, it IS easier, but it doesn't make it any prettier. Your eggs come out looking rather like baked polenta. Well, at least according to my mother. But still soft and runny and delicious, so I still have to advocate the poacher if the old-school method is a bit daunting (as it is for me).

Ingredients

8 cups sliced onions (3 large ones)

Kosher salt

1 bay leaf

4 sprigs thyme

10 black peppercorns

1 garlic clove, smashed and peeled

1 stick unsalted butter, in 8 pieces

12 ounces corned beef

3 ounces best-quality bacon, sliced about 1/2-inch thick

3 pounds sweet potatoes, peeled, cooked (boiled, roasted or microwaved) and diced

1 tablespoon minced chives

Poached or sunny-side-up eggs, for serving (optional).

Method

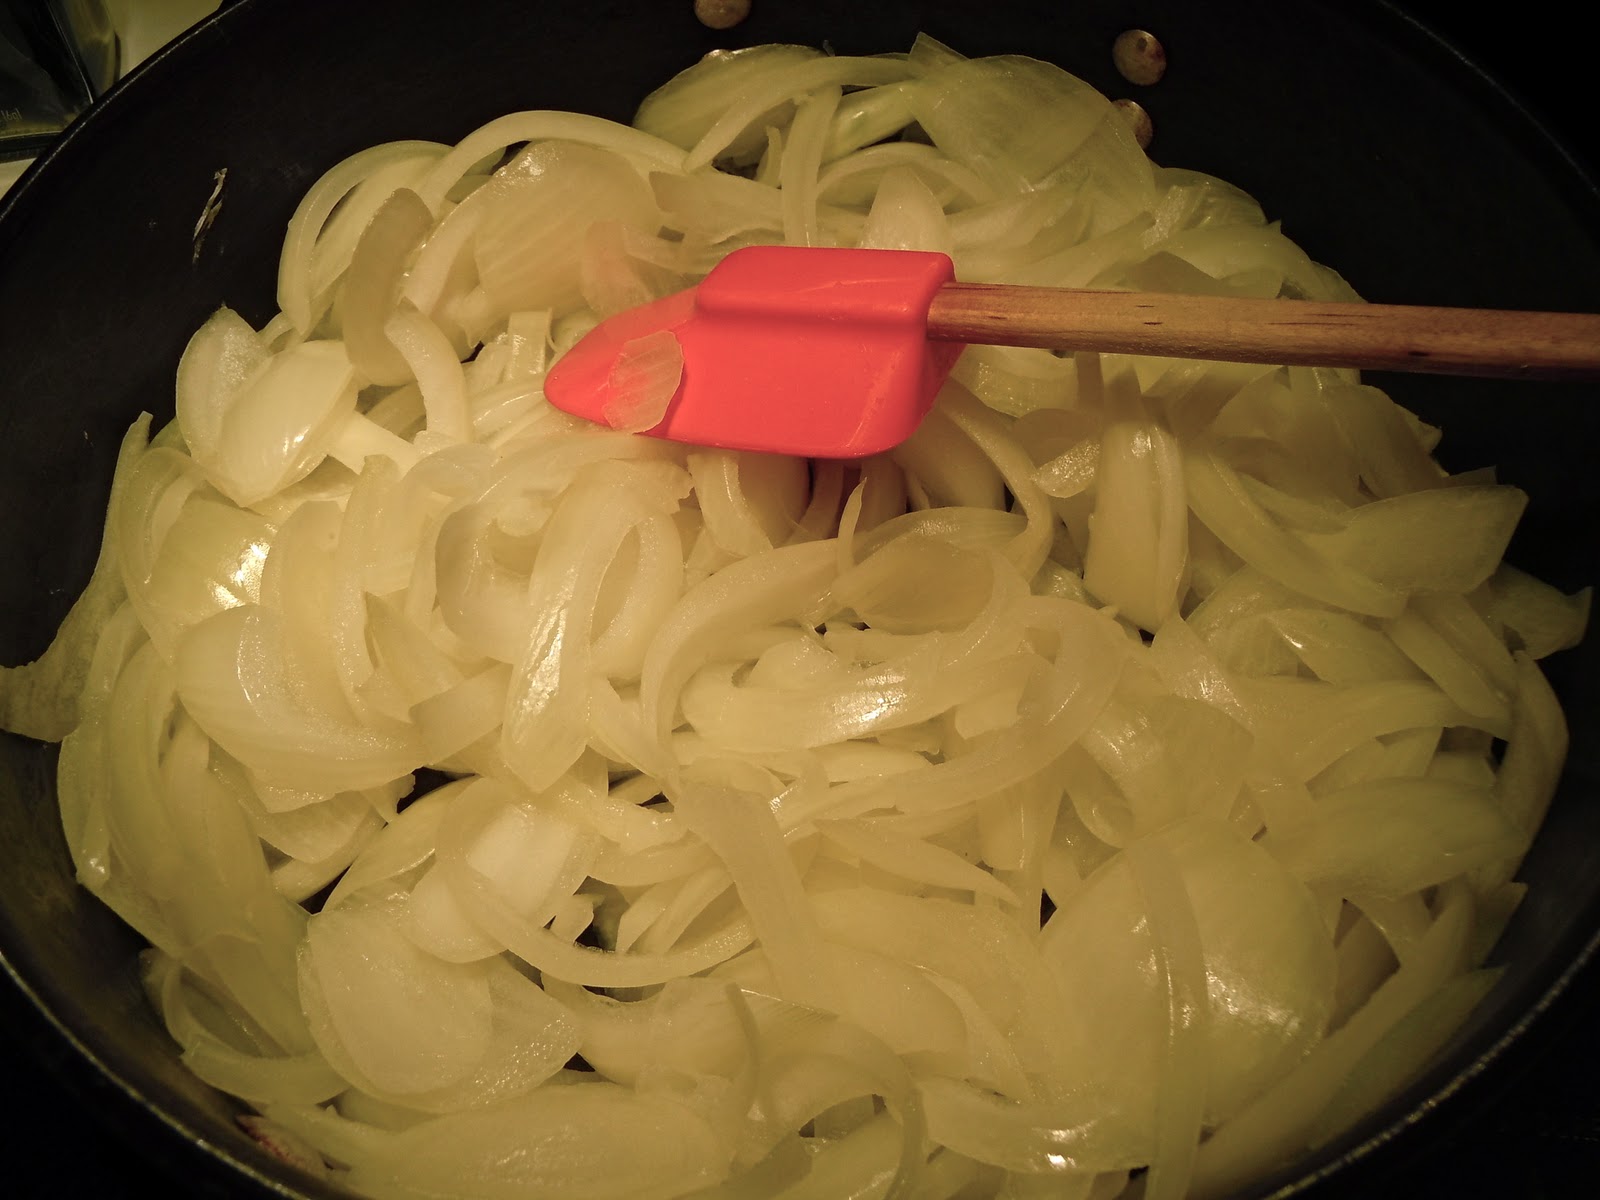
Put onions in a large skillet, place over medium-low heat, and sprinkle with 1/4 teaspoon salt. Cook, uncovered, reducing the heat to maintain a low simmer, about 20 minutes, until onions are soft and swimming in liquid.

Tie the bay leaf, 3 sprigs thyme, peppercorns and garlic in a piece of cheesecloth (I just added them to the pot. Forget the cheesecloth). Add to onions along with butter, stir and cover (not too tightly, some steam should be allowed to escape). Cook slowly 30 to 35 minutes, until onions are meltingly tender and coated in butter. The mixture should look creamy at all times: if butter separates or if pan looks dry, stir in cold water 1 teaspoon at a time. Season to taste with salt. (Onions can be made up to 3 days in advance and refrigerated.)

Cut bacon crosswise into thick matchsticks. Pour 2 tablespoons water into a medium saucepan and set over medium heat. Add bacon, reduce heat to low, and cook for 30 minutes. Bacon will render its fat and become golden, but not completely crisp. Using a slotted spoon, transfer bacon to paper towels. Pour off excess fat from pan, leaving a thick film on bottom to cook hash; reserve the extra fat. Add the corned beef to the pan to warm it (you don't need to heat it for long).

Heat oven to 200 degrees. Spread half of potatoes in pan, sprinkle with salt and add half the leaves of the remaining sprig of thyme. Cook undisturbed, over medium-low heat, until crisp, about 5 minutes. Add 1/2 cup melted onions and a quarter of the bacon  and the corned beef, and gently fold together until heated through. Transfer to an ovenproof serving bowl and keep warm. Repeat with remaining potatoes, a quarter of the bacon and corned beef, another 1/2 cup onions (refrigerate leftover onions; they make a great sauce for fish) and remaining thyme leaves. Sprinkle hash with chives (if using) and remaining bacon and corned beef. Serve hot, topped with eggs if desired.

Yield: 6 to 8 servings.

Zucchini Soufflé

Deep breath, everyone. It's soufflé time. I have avoided making one of these ever since I learned that they were the bane of every chef. "Will the soufflé rise?" seems to be the fearful question of every person who has attempted this finicky egg-based dish.  But when Bittman swore he had found an (almost) foolproof recipe, I knew it was time to face the music and give it a go.

And, who could have guessed? An "easy" soufflé recipe that was actually easy! The soufflés rose as they should in the oven, were light and fluffy on the table, and amazingly delicious! Well, the delicious part isn't so hard to imagine. I mean, the recipe is basically eggs, butter, and cheese. What's not to like? This is even a good recipe for those people who are not big fans of zucchinis (Bittman also suggests using spinach in this recipe). Now, the other ingredients probably counteract any vitamin goodness the green vegetables would give you, but hey, at least it takes away some of the soufflé guilt, right?
Right.

Ingredients

1 tablespoon butter
1/4 cup olive oil
1 large onion, chopped
1 teaspoon minced garlic
2 to 3 medium zucchini, grated
Salt and freshly ground black pepper
6 eggs, separated
8 ounces Gruyère cheese, grated
1/4 cup parsley, chopped

Method

Butter four 1 1/2 -cup ramekins or one 6-cup soufflé dish. Heat the oven to 325 degrees. Put the oil in a large skillet over medium-high heat; when it’s hot, add the onion and garlic and cook until soft, 5 to 8 minutes. Add the zucchini, season with salt and pepper, and continue cooking, stirring occasionally, until very tender, another 10 to 12 minutes. If you prefer, substitute a 10-ounce bag of spinach, chopped and cooked the same way. Drain the vegetables if there is excess liquid, and let cool.

In a large bowl, beat the egg yolks and cheese with some salt and pepper. Add the vegetables and parsley and stir. In a clean, dry bowl, beat the egg whites until they are light and fluffy and just hold soft peaks; stir about a third of the whites into the yolk mixture to lighten it, then gently fold in the remaining whites, trying not to deflate them much.

Pour the soufflé mixture into the ramekins or dish. Bake until golden and puffy, 30 to 35 minutes, and serve immediately.

Yield: 4 servings.

Chocolate Earl Grey Truffles

And thus concludes the tripartite truffle adventure. Earl grey also seems to be a flavor popping up everywhere these days and I wanted to try my hand at getting the tea flavor into chocolate.

Well, that part turned out to be amazingly easy.  Just infuse cream with earl grey leaves and leave to steep for about 5 minutes (if you can make tea, you can make these). When combined with the chocolated, it gave it a wonderfully subtle earl grey flavor. Total thumbs up from me.
The only issue with this recipe is that it didn't call for the truffles to be coated with another layer of melted chocolate as the previous two truffle recipes. This left the truffles resembling fudge rather than truffles. Now, this was not a flavor problem in the least. But, it did make the process of eating the truffles a bit of a sticky mess. I eventually decided to go ahead and dip these chocolates in another layer of chocolate, leaving them with this nice hard shell, making them much easier to eat. Either way though, they are delicious! And oh so refined.

Ingredients

2/3 cup heavy cream
2 tablespoons unsalted butter, cut into 4 pieces and softened
2 teaspoons loose Earl Grey tea leaves
6 oz fine-quality bittersweet chocolate (not unsweetened), chopped + 12 oz for outer coating (optional)
1 cup unsweetened Dutch-process cocoa powder

Method

Bring cream and butter to a boil in a small heavy saucepan and stir in tea leaves. Remove from heat and let steep 5 minutes.

Meanwhile, finely grind chocolate in a food processor and transfer to a bowl. Pour cream through a fine-mesh sieve onto chocolate, pressing on and discarding tea leaves, then whisk until smooth. Chill ganache, covered, until firm, about 2 hours.

Spoon level teaspoons of ganache onto a baking sheet. Put cocoa in a bowl, then dust your palms lightly with it. Roll each piece of ganache into a ball (wash your hands and redust as they become sticky). Drop several balls at a time into bowl of cocoa and turn to coat. Transfer as coated to an airtight container, separating layers with wax paper.

Optional Extra External Chocolate Coat: 

Line 13x9x2-inch baking sheet with foil. Place remaining 12 ounces chocolate in medium metal bowl over saucepan of barely simmering water (do not allow bottom of bowl to touch water); stir until chocolate is melted and smooth and thermometer inserted into chocolate registers 115°F. Remove bowl from over water. Working quickly, submerge 1 truffle in melted chocolate. Using fork, lift out truffle and tap fork against side of bowl to allow excess coating to drip off. Transfer truffle to prepared sheet.

Truffles can be made 1 week ahead and chilled, or 1 month ahead and frozen in an airtight container.

Caramel-Dark Chocolate Truffles with Fleur de Sel (or Hawaiian Pink Salt)

Another truffle recipe. Well, I was on a truffle roll. Everywhere you turn these days, there seems to be another version of caramel/fleur de sel recipes. I actually hadn't tried one, but found these online (again, via Bon Appetit) and they looked delicious enough to try. And since I was already in a truffle-y mood, why not? I was not, however, about to go out hunting for the magical mystical fleur de sel that the recipe advocated. I had kosher salt, sea salt, flavored salt, and even Hawaiian pink salt (a gift from a friend) in my cupboard. I was not about to go out and buy yet another version of salt for truffles. 
Although I was curious as to what the big deal was with the product all of a sudden. It seems everywhere chefs are advocating using it instead of regular salt but for all my searching, I'm still not sure why. Apparently, it is supposed to have a more delicate flavor than regular sea salt (and the fact that it is "hand harvested" always goes a long way for gourmet products) but I haven't found anywhere that says you can't substitute a regular sea salt for any recipe that calls for it.
So hey, if you have it, by all means, go ahead and use it. I used the pink sea salt just because I thought it looked nice. And they still tasted delicious.  
Ingredients 

20 ounces bittersweet or semisweet chocolate, finely chopped, divided
1/3 cup sugar
2 tablespoons water
2/3 cup whipping cream
1/4 teaspoon fleur de sel (or sea salt or, for me, Hawaiian pink sea salt)
1/2 cup unsweetened cocoa powder
Additional fleur de sel (or whatever salt you're using)

Method

Place 8 ounces chocolate in metal bowl over saucepan of barely simmering water (do not allow bottom of bowl to touch water); stir until chocolate is smooth (This part can be tricky. For help with this, see my note for Gingerbread Truffles). Remove chocolate from over water.

Combine sugar and 2 tablespoons water in small saucepan. Stir over medium heat until sugar dissolves, occasionally brushing sides of pan with wet pastry brush. Increase heat; boil until syrup is deep amber color, brushing down sides and swirling pan occasionally, about 4 minutes. Add cream (mixture will bubble). Stir over very low heat until caramel is smooth. Mix caramel and 1/4 teaspoon fleur de sel into melted chocolate. Chill until truffle filling is firm, at least 3 hours.

Place cocoa in bowl. Using 1 tablespoon truffle filling for each truffle, roll into balls, then roll in cocoa. Arrange on baking sheet. Cover; chill overnight.

Line 13x9x2-inch baking sheet with foil. Place remaining 12 ounces chocolate in medium metal bowl over saucepan of barely simmering water (do not allow bottom of bowl to touch water); stir until chocolate is melted and smooth and thermometer inserted into chocolate registers 115°F. Remove bowl from over water. Working quickly, submerge 1 truffle in melted chocolate. Using fork, lift out truffle and tap fork against side of bowl to allow excess coating to drip off. Transfer truffle to prepared sheet.

Repeat with remaining truffles. Sprinkle truffles lightly with additional fleur de sel. Let stand until coating sets, at least 1 hour. (Can be made 1 week ahead. Cover and chill. Bring to room temperature before serving.)

Gingerbread Truffles

 We may be a bit past the time of year for gingerbread. But hey, things that are rich, delicious, and covered with chocolate never go out of season. Behold: gingerbread truffles. I'm not a huge huge fan of gingerbread by itself but these truffles, well, they take all the potential dryness and bread-iness of usual gingerbread and, well, make it exponentially better. By taking out the bread and adding chocolate. 
And who can argue with that?
The original recipe (from Bon Appetit, December 2005) called for half of these to be dunked in semi-sweet chocolate but as I'm a sucker for white chocolate (and I was making other kinds of semi-sweet truffles), I decided to go all white chocolate for this recipe. And I was pleased with my decision. Very pleased. 
Ingredients

3/4 cup whipping cream
10 whole allspice
10 whole cloves
1 tablespoon mild-flavored (light) molasses
1 1/2 teaspoons grated peeled fresh ginger
1/2 teaspoon ground cinnamon
Pinch of salt

7 ounces bittersweet (not unsweetened) or semisweet chocolate, chopped

7 ounces plus 12 ounces high-quality white chocolate (such as Lindt or Perugina), chopped
1/2 cup chopped crystallized ginger plus additional for garnish

Method

Bring first 7 ingredients just to boil in heavy medium saucepan; remove from heat and let steep 1 hour.
Combine 7 ounces bittersweet chocolate and 7 ounces white chocolate in large metal bowl set over saucepan of simmering water; stir until chocolate is melted and smooth (see chef's note at bottom for help with this). Remove bowl from over water. Strain cream mixture into chocolate; stir to blend. Stir in 1/2 cup chopped crystallized ginger. Chill filling until firm, at least 3 hours.

Line baking sheet with parchment. Using 1-inch melon baller, scoop filling and roll between palms to form balls. Place on parchment. Chill truffles at least 2 hours.

Line another baking sheet with parchment. Place 12 ounces white chocolate in another medium metal bowl set over saucepan of simmering water; stir until melted and smooth. Remove bowl from over water. Cool until thermometer inserted into chocolate registers 100°F. Hold 1 truffle between thumb and index finger; dip halfway into white chocolate. Place on prepared sheet. Repeat with remaining truffles. If desired, press small pieces of crystallized ginger atop truffles. Chill until firm, about 30 minutes. (Can be made 1 week ahead. Cover; keep chilled.)

Chef's Note: Now, truffles are the latest "hip" make-it-yourself gift and, as a "hip gift-giver" myself, I admit, these work well. They look impressive and well, who doesn't like truffles? There is a trick to working with chocolate though. When double-boiling/melting the chocolate, you run the risk of having the chocolate separate on you, making it go all glossy and nasty. It won't fridge right, and it'll make it impossible to work the ganache into balls. If this does happen, never fear! If you see your chocolate start to separate, throw a dash (only a dash!) of hot/boiling water into the melting chocolate. The chocolate will come right back together and you can get on with your ganache making in safety. This happens to me almost every time I make anything with chocolate and without this trick, I would have given up chocolate long ago.